To show the internet readers that you are the author of articles on your own blog, this generating the appearance of a snippet with your face the moment someone finds what one is interested in when searching on Google, and what is found is published by you, on your blog, you need to make some steps regarding authorship.
These are snippet examples:
If you want your authorship information to appear in search results for the content you create, you’ll need first, a Google+ Profile with a good, recognizable head-shot as your profile photo. Then, verify authorship of your content by associating it with your profile using either of the methods below. The following information is taken from Google Webmaster Tools.
Option 1:
Link your content to your Google+ profile using a verified email address.
If you don’t have an email address on the same domain as your content, just follow the instructions listed in Option 2 below.
Check that you have a email address (for example, [email protected]) on the same domain as your content (rodolfogrimaldi.com).
Make sure that each article or post you publish on that domain has a clear byline identifying you as the author (for example, “By Daniel Mihai Popescu” or “Author: Daniel Mihai Popescu”).
Visit the Authorship page and submit your email address to Google. No matter how many articles or posts you publish on this domain, you only need to do this process once. Your email will appear in the Contributor to section of your Google+ profile. If you want to keep your email private, change the visibility of your link.
To see what author data Google can extract from your page, use the structured data testing tool.
[source]
Option 2:
Set up authorship by linking your content to your Google+ profile
Create a link to your Google+ profile from your webpage, like this:
<a href="[profile_url]?rel=author">Google</a>
Replace [profile_url] with your Google+ profile URL, like this:
<a href="https://plus.google.com/+DanielMihaiPopescu?rel=author">Google</a>
Your link must contain the
?rel=authorparameter. If it’s missing, Google won’t be able to associate your content with your Google+ profile.
Add a reciprocal link back from your profile to the site(s) you just updated.
Edit the Contributor To section.
In the dialog that appears, click Add custom link, and then enter the website URL.
If you want, click the drop-down list to specify who can see the link.
Click Save.
To see what author data Google can extract from your page, use the structured data testing tool.
If you don’t want your authorship information to appear in search results, edit your profile (using http://plus.google.com/me/about/edit), and make sure the Profile discovery option Help others discover my profile in search results is unchecked.
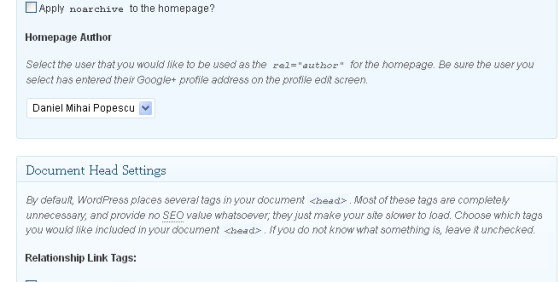
Plus, Genesis Framework users, will have their author profile highlighted in their SEO settings. Marvelous! I haven’t presented this as a third option because it’s too new to have tested myself, but anyway, it’s good for you to know! Look at the snapshot below:
If you liked what you read (and for that I humbly thank you for your patience), subscribe to this blog by Email! Follow this blog on Twitter, and on Facebook! For a joyous day, check out my pins on Pinterest or my grams on Instagram 😄. I hope you like this blog so much that you think it’s time to take a step further by becoming yourself a blogger; in order to do that have the kindness to read the Own Your Website offer I have prepared for you! You won’t regret. Thanks for passing by 😄 Speak your mind, don’t be shy!
Copyright © 2013 Rodolfo Grimaldi Blog – Google Plus Authorship


